This is part one, covering the setup and dhcp tabs.
Router documentation is well written from a technical standpoint. It tells you exactly what each option is. What it often lacks is a description of what each option does, and what setting is recommended. In this blog post series, I will describe each tab and setting of a RV016 Linksys router, and what the settings do and should be set to. Your settings will obviously not be the same as mine, but my examples should head you in the right direction.
Before we start, you need to know your IP address scheme. There are a million sites on this, so I will not get into it. I would suggest writing it out on paper to refer to while configuring. It also helps to know what services you will be running on the domain. You only want to allow through what you need to let through, and UPnP often opens “extra” ports in your router that are not specifically needed.
To get a general understanding of how the router works, I will describe the path information takes when leaving a domain.
- A workstations sends out a data packet.
- It queries a DNS server on where it should go. The DNS server will in most cases be your server, or a server.
- It then gets forwarded to the correct IP address- in this case the internal IP address of your RV016, or your default gateway.
- Then that router queries its external DNS, which is most likely your ISP. With that information, your router sends the data to the correct location.
I know a lot more goes on under the hood, but this is a basic explanation of how the network path will go- keeping a visual of this in your head helps when designing IP addresses and pointing DNS.
For this explanation, I will assume that you have bought the router, have an internet connection with a static IP address, your server has a NIC, and that you have connected at least 1 workstation and the server to the router ports, and the router is connected to your modem.
This article also assumes that you know the basics, and can gloss over items not generally used in a simple server network. Furthermore, I assume that you know you must hit save after changes, and how to navigate tabbed browsing- do not get angry if you changes do not take due to not saving your work.
In this scenario we use Comcast Broadband cable, with a static IP address of 70.89.23x.x5- I am going to leave some IP bits masked for security purposes. Not that I mind if my public IP address is known, but why risk it, right? The internal IP addressing scheme that I used was 192.168.1.1. In hindsight, this was a mistake. As the default, most home network have this type of IP address. this causes problems when connecting remote machines to the network, with IP address conflicts. Pick something else- even as simple as 192.168.5.1.
Our router is connected, let’s log in. The default IP is 192.168.1.1, so open up a web browser and type that into the address bar. you will be prompted for a user name and password. Administrator is the user name (the RV016 is case-sensitive, fyi) while the password is either admin, or 1234.
Your ports will not be green, and your ip addresses will not be filled out.
The green boxes are port status- telling you if a port is active or not. This can be important for troubleshooting.
LAN IP is the routers internal IP address. This is 192.168.1.1.
WAN1 and 2 IP are the external IP addresses of the router. I only use one, but you can configure two to host another network, provide modem failover, bandwidth throttling, etc.
DMZ is for the demilitarized zone, if you plan to provide a separate network segment for internet access.
You will want the mode to say Gateway if this is your main router.
Then you have DNS, this is your external DNS- the DNS of your IP. Comcast’s main DNS is 68.87.73.242. This can be changed to suit your needs and location. Google Public DNS and OpenDNS are alternatives.
The rest of the settings are for later, lets just skip over them.
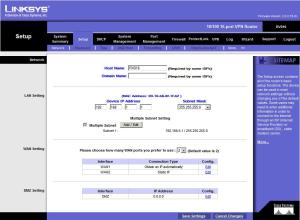
The first thing you will do is set up your IP address. Click the setup tab up top.
Host and Domain name will most likely be left blank.
Device IP address will remain at 192.168.1.1, unless your address scheme is different. Say your network is 10.1.10.1, then this would be the device IP address.
Chose a subnet mask to fit your network. The default and mine is 255.255.255.0. And explanation of ip addresses and subnets can be found here. After, you can add multiple subnets. I have one added, though it is not in use. If you don’t know what this is, you don’t need to change it 🙂
In the bottom tables, you have settings for your WAN ports. I only use WAN2, so I will leave WAN1 set to automatically obtain IP address, which is nothing in this case. I will also leave DMZ alone, as I do not use a DMZ. Click edit for each of these items if you wish to use them.
Click Edit on WAN2, and we will configure this ports settings.
Select Static IP.
Enter in the WAN IP address provided by your ISP. this is your internet IP.
Provide the subnet mask and default gateway they they provide. This should all be on the pink slip you got when the internet was installed.
DNS server are your external ISP’s DNS servers. For most cases, leave MTU to auto- we can alweays adjust it later if necessary. Save and click on password subtab.
Change the router password. Use complex strong passwords, and change them every couple of months. I have a string that I remember because it rhymes, but it is very complex with all the trimmings. I would suggest doing the same, and NOT writing it down.
If I was a burglar, and I broke into your server room, the first thing I would do would be to check drawers, under the keyboard and calendar, and notebooks for written down passwords (then I would probably pry open the case to steal your HDD’s, but that’s for later).
Save and move on to Time. Leave this as default, unless you need to change it. DMS Host- we dont need to change this with no DMZ.
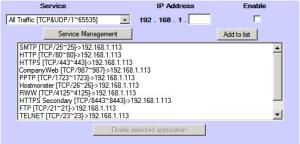
Forwarding- this is a BIG one! In order for your network to even work, there are certain things that you need to forward to the server. This is telling certain types of communication coming into your network via the external IP address that they need to report to the server, who then forwards them on to their destination (ther server is the internal DNS server).
I will list the things you need to forward to your DNS server. Bold text is necessary, underlined is probably necessary, and regular text is optional depending upon services.
- SMTP– TCP25, allows mail to come in, dependent upon your email configuration
- HTTP– TCP80- web browsing, and a lot of default services
- HTTPS– TCP443- Secure HTTP, used for Remote Companyweb/RWW/etc
- Companyweb– TCPxxx- this is the port that you set up remote Sharepoint access on, which is changed in IIS Manager
- PPTP- TCP1723- if you dont know what this is leave it alone, but this allows VPN connection
- Hostmonster- TCP26, my remote mail provider does not operate on port 25, we use 26 instead
- RWW– TCP4125, for Remote Web Workplace access
- HTTPS Secondary- TCP8443, default secondary HTTPS port, used for multiple secure sites. I use mine for a private database site
- FTP- TCP21, use this if your network has any FTP sites or servers
- TELNET- TCP23, use this if you have any need to telnet into the server. I use this for mail troubleshooting, and disable it when not needed
- L2TP- UDP1701, this is used for VPN tunneling protocol. DO NOT enable this unless you use L2TP VPN
- RD– TCP3389, Remote Desktop port. This can be defined through your network access policy
You can of course add to this list. If you need a port open for a particular application, then open that port and forward it to the server. Do not open spare ports for the heck of it. Remember that this router supports UPnP. You can also run UPnP, and then run the Connect to the Internet Wizard. I prefer not to do this, personally.
One to the one-to-one nat tab; you probably don’t need this enabled for a simple network. MAC Clone, DDNS, and Advanced Routing you will most likely leave alone.
DHCP Tab
You will only enable this if your router is handling DHCP, which provides IP addresses for connected devices. A typical server setup will have the server providing DHCP. There are configurations using both server and router DHCP in case of server failure or vice versa- but typically you will leave this setting alone. The status tab tells you the status of the router DHCP if it is enabled.


